Introduction
Sherlock's is a secure multi-channel e-commerce payment solution that complies with the PCI DSS standard. It allows you to accept and manage payment transactions by taking into account business rules related to your activity (payment on despatch, deferred payment, recurring payment, payment in instalments, etc.).
The purpose of this document is to help you customise the payment pages of the Sherlock's solution. That includes both Payment Pages and Wallet Management Pages. In this way, you provide your customers with an optimised purchase experience by implementing your own graphic charter during the payment phase.
These pages are developed with responsive design.
Today, with web terminals increase (PCs, tablets, smartphones, TVs, etc.), introducing into the market a multitude of sizes, screen resolutions and levels of support of web standards very diverse, the web products must be designed to ensure the access to the information in this wide range of contexts without degradation of the customer experience.
The LCL Sherlock's solution pages are adapted to this new reality.
However, we would like to draw your attention to the necessity of making sure that your customisation elements are compatible with the Web browsers used by the general public, and that they comply with the current accessibility standards. You are solely responsible for the elements provided and, therefore, guarantee their quality.
Who does this document target?
This document is intended to help you customise payment pages or wallet management pages from Sherlock’s Paypage
This document is an implementation guide for your technical team.
To get an overview of the Sherlock's solution, we advise you to consult the following documents:
- Functional presentation
- Functionality set-up guide
- Glossary
Prerequisites
Sherlock's pages customisation is mostly based on overwriting the CSS. Consequently, this guide is addressed to technical users with HTML5 and CSS3 knowledge.
To ease the modification of the different pages, the use of tool such as “Firebug” for Mozilla is recommended. It allows to quickly spot the CSS rules to modify and allows to emulate the browser in smartphone and tablet mode. Note that the web browser Google Chrome also allows those manipulations by using the “F12” key.
How does the customisation works?
Responsive pages
The Sherlock's pages have all been designed on the principle of responsive web design. This means that the pages will natively adapt to the different screen sizes of existing terminals in order to offer an optimal reading experience, regardless of the terminal used by the customer (smartphone, tablet, PC, etc.).
3 form factors are defined:
- 300 px -> 650 px = smartphone format;
- 650 px -> 1 000 px = tablet + small screens format;
- > 1 000 px = PC format, TV screeen, etc. (note that the container freezes at 1 366 px).
The form factors are defined on the different stylesheets thanks to the use of media queries (for more information: http://www.w3.org/TR/css3-mediaqueries/). These media queries have appeared with the CSS3 specifications and make it possible to define conditions for applying the CSS properties.
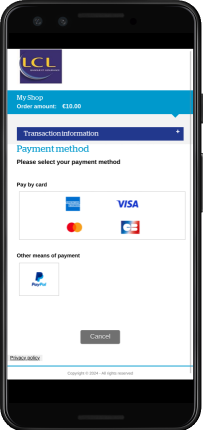
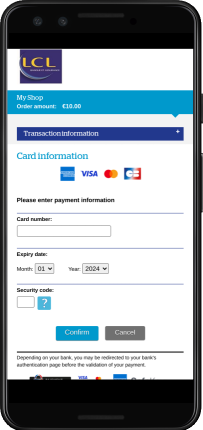
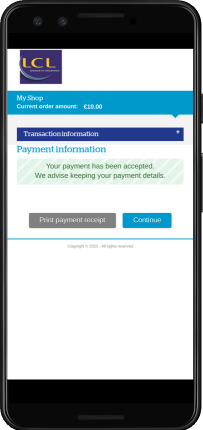
Default LCL customisation
Here is an example the rendering of LCL payment pages on a mobile terminal:
How to customise
To change a display on a specific device, you must add CSS rules in the right media query.
For example, to add a rule to display on tablets, use the following media query:
@media screen and (min-width: 650px) and (max-width: 1000px) {
      /*Règles CSS pour un affichage sur tablette */
}
To add a rule to display on smartphones, use the following media-query:
@media screen and (max-width: 650px) {
      /*Règles CSS pour un affichage sur smartphone */
}As another example, to customise a page for the iPhone 5, the following code must be added at the end of the style sheet:
@media screen and (device-width: 320px) and (device-height: 568px) and (-webkit-device-pixel-ratio: 2){
/** code CSS complet à utiliser sur l’iPhone 5 **/
}Merchant customisation
On Payment pages and Wallet Management pages, you can customise:
- CSS;
- Templates (code HTML);
- Images;
- Messages.
The offer customisation will always be loaded in first. You can then override some aspects of the customisation.
All of these functionalities are described in the following chapters of this document.
Below is described the most important part of your customisation loading.
CSS :
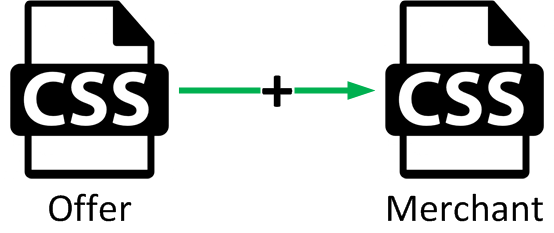
Your CSS will be added to the CSS offer. You make changes by defining new properties in your CSS file.
Templates :
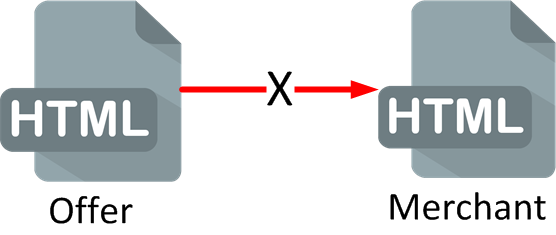
If specific templates are provided in your customisation, they will replace the offer templates.
Images :
Images are directly referenced from templates or CSS. (Your CSS will load images from your images folder. An offer CSS will load images from your image directory.)
Messages :

If a custom message is defined both for the offer and for you, only yours will be will be loaded.
Pages structure
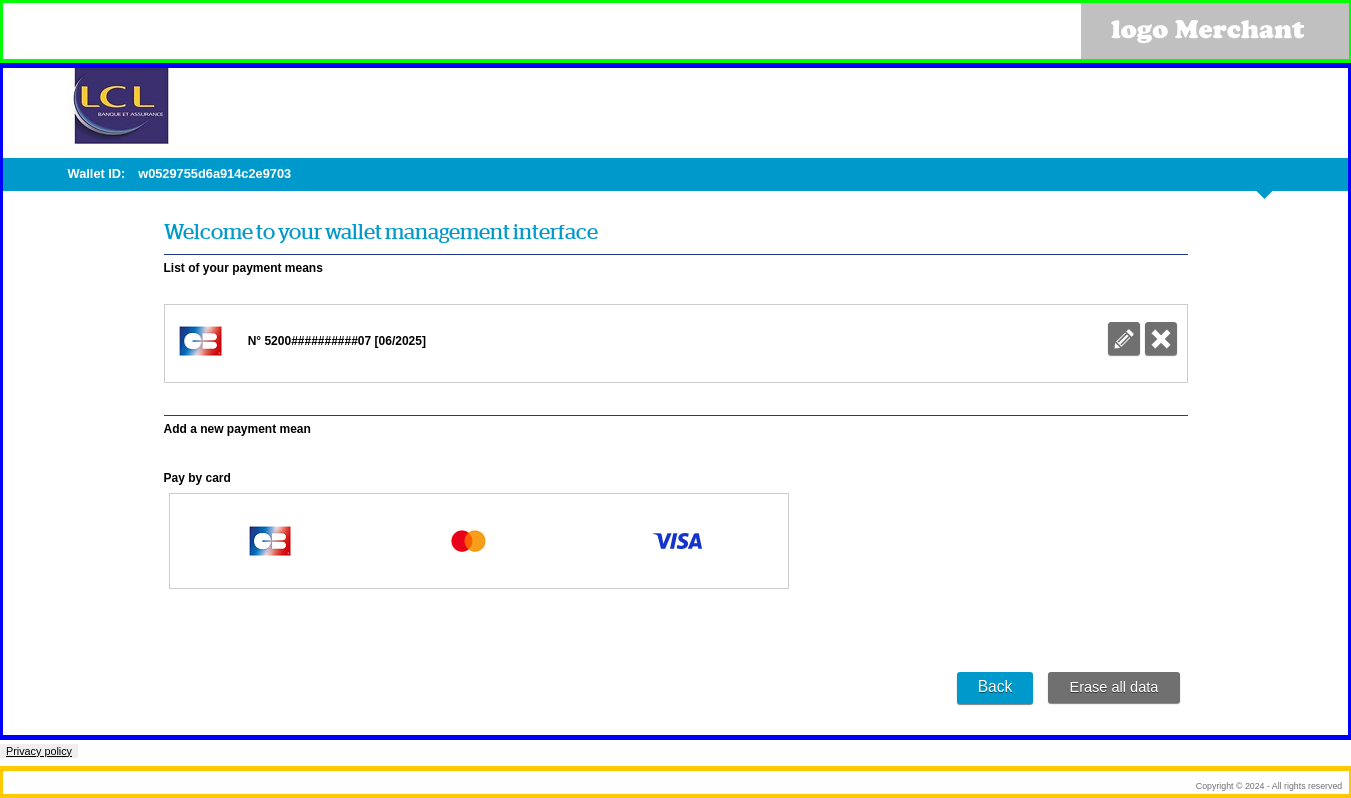
All payment pages are structured using those main blocks:
- a Header, shown in green below;
- a Main Zone that contains all of the elements of the payment page (entry fields, messages, etc.) or the wallet management page (list of means of payment, etc.), shown in blue below;
- a Footer, shown in orange below.
Payment page structure

Wallet management page structure
Payment pages customisation
Customising the main zone
The Main Zone can be customised using a CSS stylesheet.
To avoid compatibility problems with certain browsers, it's highly recommended to check CSS file encoding. It should be “UTF-8 WITHOUT-BOM”. You can check the format used in your text editor.
Customising the merchant logo
The merchant logo can be customised using the following CSS code:
p.vendor {
       background: url(../images/your_vendor_logo.png);
       height: HauteurdeVotreLogo;
}
Customising the header and footer
An additional HTML content may be inserted into the header or footer, for example to display images or links or simple texts (copyright-free logo, copyright notice, legal information, etc.).
Here's an example of HTML content that can be inserted into the header:
<div id="headerMerchant">
  <img src="context:images/logoMerchant.png" />
</div>
and into the footer:
<p>Copyright © 2015</p>Only simple blocks have to be declared in these files. The <html>, <head> or <body> tags are prohibited.
Any call to a stylesheet other than the one defined beforehand or to a script is also forbidden (<link>-type tags).
Example of an incorrect HTML code.
<!DOCTYPE HTML PUBLIC "-//W3C//DTD HTML 4.01 Strict//EN" http://www.w3.org/TR/html4/strict.dtd">
<html>
  <head>
    <link rel="stylesheet" type="text/css" href="http://mywebsite.com/style.css" />
  </head>
  <body>
    <div id=”headerMerchant”>
      <div id=”logoMerchant”>
        <img src=” http://mywebsite.com/logoMerchant.png” />
      </div>
    </div>
  </body>
</html>
...to be replaced by:
<div id=”headerMerchant”>
  <div id= ”logoMerchant”><img src= ”context:images/logoMerchant.png” /></div>
</div>List of the prohibited HTML tags:
- <!DOCTYPE>
- <html>
- <head>
- <title>
- <meta>
- <link>
- <script>
- <body>
Customising the favicon
If a « favicon.ico » is present in your "/Images" folder, and if a customisation is called in request, the specific favicon will be loaded.
Specific messages
You also have an opportunity to add your own text messages in the payment pages. These messages appear at predefined locations on the page.
To do so, you have to define these messages as sets of "key/value" combinations in which each key corresponds to the exact location of the message on a page:
capture.message.3=Cliquez sur "Valider" pour procéder au paiement.If you do not want to use a message, just do not specify a value for the given key.
receipt.message.2=For further information about the implementation of this file and the internationalisation of these messages, please refer to the 3.1 and 6.2 paragraphs in this document.
All keys in use are defined in the appendices.
Constraints
Non customisable logos
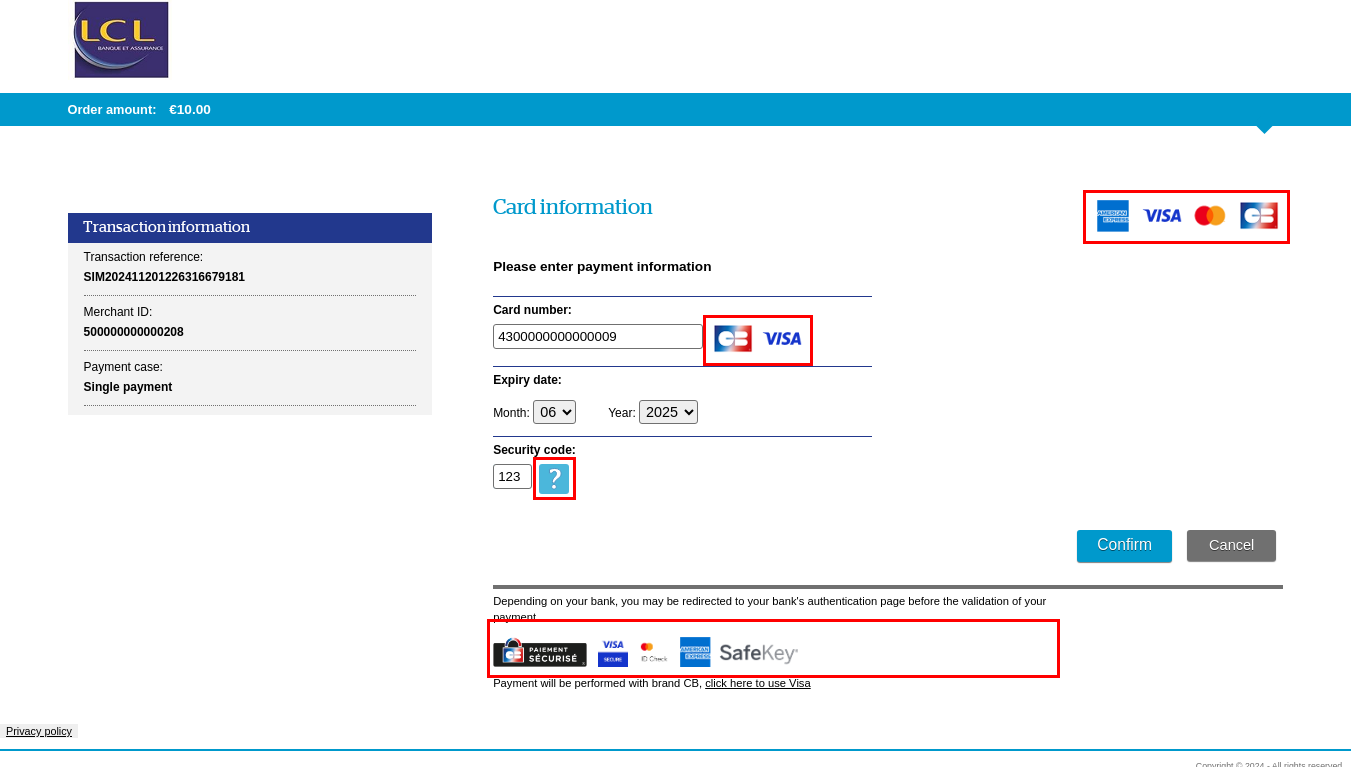
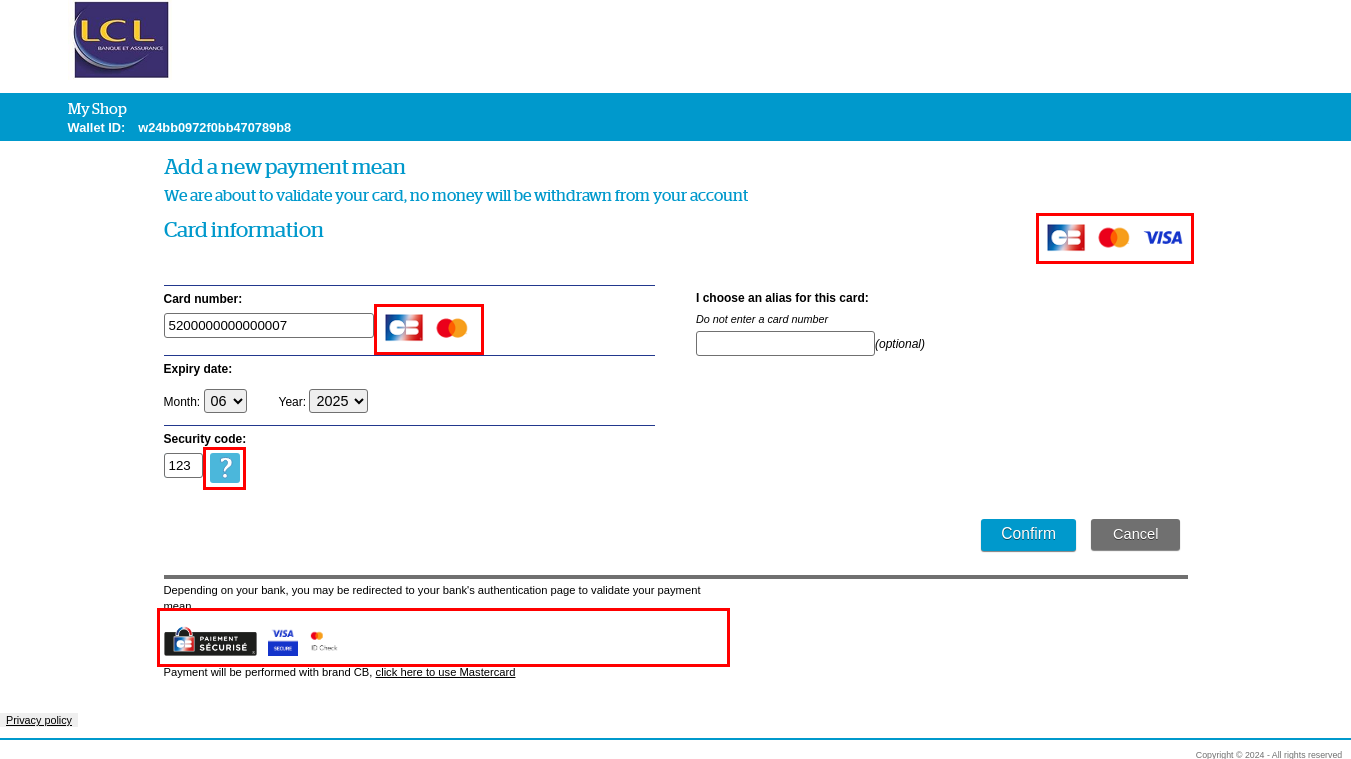
The following images, displayed by default in the forms, are not customisable:
- The (VISA, MASTERCARD, etc.) means of payment logos and the "Verified by Visa" and "MasterCard Secure" logos: these are the official logos of the brands, these logos are displayed on the pages of all the web-merchants. They are therefore not modifiable. ;
- CVV help logo: It's also a logo displayed on every web merchants pages. It's possible to hide it by using the CSS but you can't replace it.
Wallet management pages customisation
Customising the main zone
The main zone can be customised via a CSS stylesheet. This stylesheet is the same as the one used for customising Sherlock's payment pages.
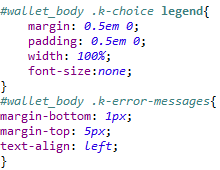
A part of the stylesheet is dedicated to the "wallet management" part, as described below:
In this code, all wallet management rules must be preceded by the block ID "wallet_body", as shown below:
Customising the header and footer
An additional HTML content may be inserted into the header or footer, for example to display images or links or simple texts (copyright-free logo, copyright notice, legal information, etc.).
Here's an example of HTML content that can be inserted into the header:
<div id="headerMerchant">
  <img src="context:images/logoMerchant.png" />
</div>
and into the footer:
<p>Copyright © 2015</p>Only simple blocks have to be declared in these files. The <html>, <head> or <body> tags are prohibited.
Any call to a stylesheet other than the one defined beforehand or to a script is also forbidden (<link>-type tags).
Example of an incorrect HTML code.
<!DOCTYPE HTML PUBLIC "-//W3C//DTD HTML 4.01 Strict//EN" http://www.w3.org/TR/html4/strict.dtd">
<html>
  <head>
    <link rel="stylesheet" type="text/css" href="http://mywebsite.com/style.css" />
  </head>
  <body>
    <div id=”headerMerchant”>
      <div id=”logoMerchant”>
        <img src=” http://mywebsite.com/logoMerchant.png” />
      </div>
    </div>
  </body>
</html>
...to be replaced by:
<div id=”headerMerchant”>
  <div id= ”logoMerchant”><img src= ”context:images/logoMerchant.png” /></div>
</div>List of the prohibited HTML tags:
- <!DOCTYPE>
- <html>
- <head>
- <title>
- <meta>
- <link>
- <script>
- <body>
Customising the favicon
If a « favicon.ico » is present in your "/Images" folder, and if a customisation is called in request, the specific favicon will be loaded.
Constraints
Non customisable logos
The following images, displayed by default in the forms, are not customisable:
- The (VISA, MASTERCARD, etc.) means of payment logos and the "Verified by Visa" and "MasterCard Secure" logos: these are the official logos of the brands, these logos are displayed on the pages of all the web-merchants. They are therefore not modifiable. ;
- CVV help logo: It's also a logo displayed on every web merchants pages. It's possible to hide it by using the CSS but you can't replace it.
Recommendations
Customising resources
By customising Wallet Management pages, you should take care of every resource you customised on Payment Pages.
For example: if a Submit button has been added on Payment pages, it will be used by default on Wallet Management pages. Maybe a specific one should be added too for Wallet Management pages.
Security
Since the Sherlock's pages are hosted in a secure environment subjected to the PCI-DSS standard, some rules have to be complied with regarding customisation:
- Only static HTML code is allowed. Using JavaScript or calling iframes is forbidden in the Header and Footer templates.
- Cross-domain references are forbidden: the HTML code and all of the references have to be hosted on the Sherlock's platforms.
- The Header and Footer blocks must not overlap each other or be part of the Main Zone of the payment page.
- The content of the Main Zone of the page cannot be modified using HTML code coming from the merchant. Additional images can be included into the header and footer, but not into the main zone.
Resources loading
In order to optimise the loading time of the pages and thus to add browsing comfort for the customer, it is recommended to have a reasonable page weight by limiting the number and the weight of the images.
Accessibility
All of the pages of the Sherlock's solution comply with the WCAG AA accessibility standard.
Therefore, we strongly encourage you to provide customisation elements that comply with this standard.
For instance, the font sizes have to be dynamic (not fixed), and the colour contrast has to be sufficient. A list of the WCAG requirements can be downloaded from the W3C website (http://www.w3c.org).
Any customisation element also has to be compatible with all the web browsers used by the general public (Internet Explorer, Edge, Firefox, Chrome, Safari and Opera).
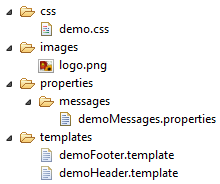
Resources organisation
The customisation elements of the pages are organised as follows:
- a CSS directory containing a file called <templateName>.CSS that makes it possible to customise the Main Zone;
- a templates directory containing a file called <templateName>Header.template that contains the static HTML content that will be displayed in the header of the payment page;
- a templates directory containing a file called <templateName>Footer.template that contains the static HTML content that will be displayed in the footer of the payment page;
- an images directory containing all of the static image resources (your logo etc.);
- a messages directory (subdirectory of properties) containing a file called <templateName>Messages.properties that contains all the specific messages that you have defined.
where <templateName> is the name given to the customisation template. The format to comply with is an alphanumeric string of 32 characters at most. Refer to the Sherlock's data dictionary for further information.
Example of a tree structure for a template called demo:
Language support
All the supported languages ares listed here:
| Code | Langue |
|---|---|
| cs | Czech |
| da | Danish |
| de | German |
| el | Greek |
| en | English |
| es | Spanish |
| et | Estonian |
| fi | Finnish |
| fr | French |
| hu | Hungarian |
| it | Italian |
| ja | Japanese |
| ko | Korean |
| lt | Lithuanian |
| lv | Latvian |
| nl | Dutsch |
| no | Norwegian |
| pl | Polish |
| pt | Portuguese |
| ro | Romanian |
| ru | Russian |
| sk | Slovakian |
| sl | Slovenian |
| sv | Swedish |
| tr | Turkish |
| uk | Ukrainian |
| zh | Chinese |
CSS
Here's how to manage internationalised CSS (in English and French). To do this, you must provide:
- a file called <templateName>_en.css that will be loaded if the payment flow is in English;
- a file called <templateName>_fr.css that will be loaded if the payment flow is in French;
- a file called <templateName>.css that will be loaded for all the other languages.
where <templateName> is the name given to the customisation template. The format to comply with is an alphanumeric string of 32 characters at most. Refer to the Sherlock's data dictionary for further information.
Header and footer
If the personalisation elements of the header or footer contain a text translated into several languages, you must provide as many files as languages to manage. Each file name will have the appropriate language code (ISO 639-1 language code).
Thus, to set up headers and footers in English (en) and French (fr), you must provide:
- a file called <templateName>Header_en.template that will be displayed if the payment process is in English;
- a file called <templateName>Header_fr.template that will be displayed if the payment process is in French;
- a file called <templateName>Header.template that will be displayed for all the other languages;
- a file called <templateName>Footer_en.template that will be displayed if the payment process is in English;
- a file called <templateName>Footer_fr.template that will be displayed if the payment process is in French;
- a file called <templateName>Footer.template that will be displayed for all the other languages.
where <templateName> is the name given to the customisation template. The format to comply with is an alphanumeric string of 32 characters at most. Refer to the Sherlock's data dictionary for further information.
Specific messages
To ensure the translation of specific messages, it is necessary to provide as many files as languages to manage. Each file name will have the appropriate language code (ISO 639-1 language code).
Thus, to set up the messages in English (en) and French (fr), you must provide:
- a file called <templateName>Messages_en.properties that contains all of the messages for the English language and the specified template;
- a file called <templateName>Messages_fr.properties that contains all of the messages for the French language;
- a file called <templateName>Messages.properties that contains all the messages for the other languages.
where <templateName> is the name given to the customisation template. The format to comply with is an alphanumeric string of 32 characters at most. Refer to the Sherlock's data dictionary for further information.
Brand choice specific case
Template name
As part of the regulatory evolution of the brand choice, the merchants using the old API are migrated to the Sherlock’s Paypage pages.
As a reminder, the evolution of the brand choice allows the end user to choose the brand (CB, Visa or Mastercard) to pay when using a co-branded card CB/Visa or CB/Mastercard.
These merchants must follow the instructions in the current document in order to update their customisation.
In this case, if <USE_CSS> keyword or Template mode are used on Sherlock's solution (via the API), the value will be passed through the Gateway and used as the template name on Payment pages.
You would take care of naming your customisation with this this template name value.
Appendices
Non-customisable pages
Customisable messages list
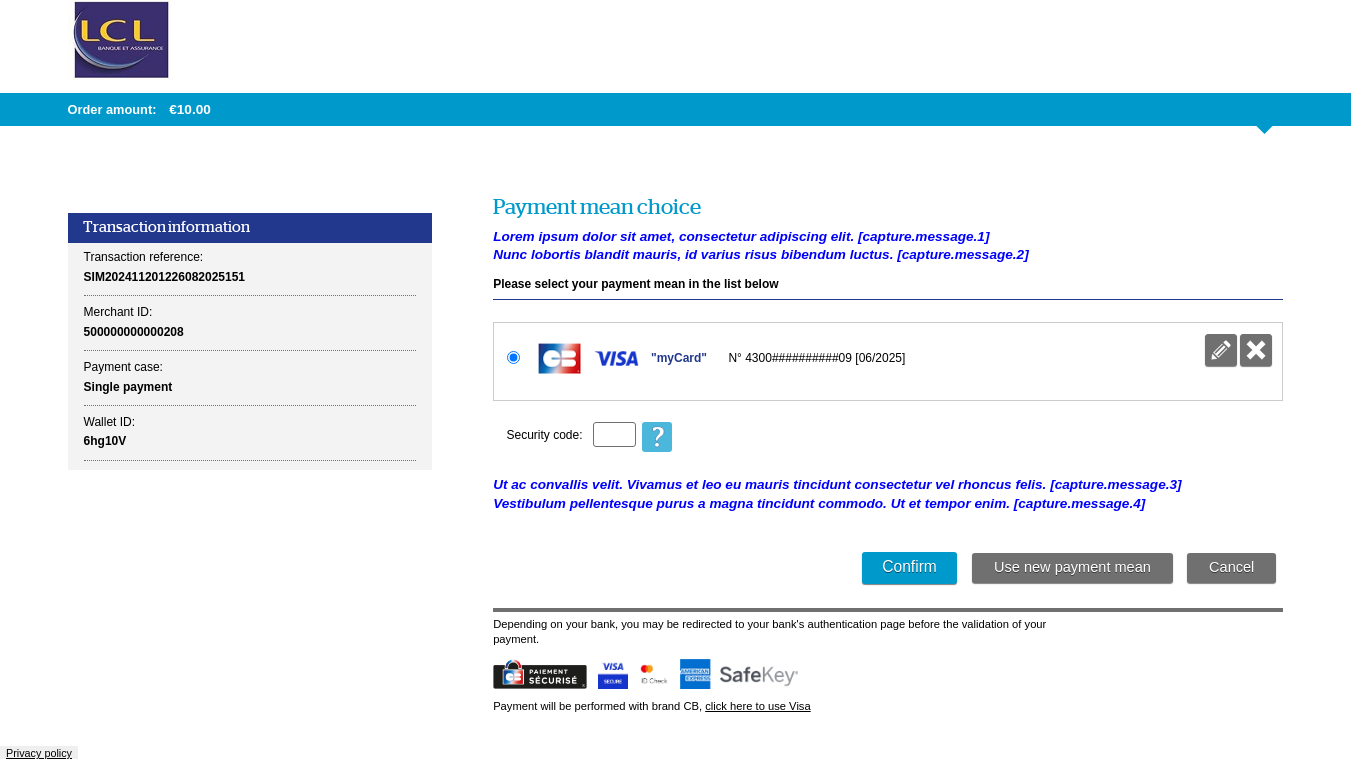
Payment means selection page
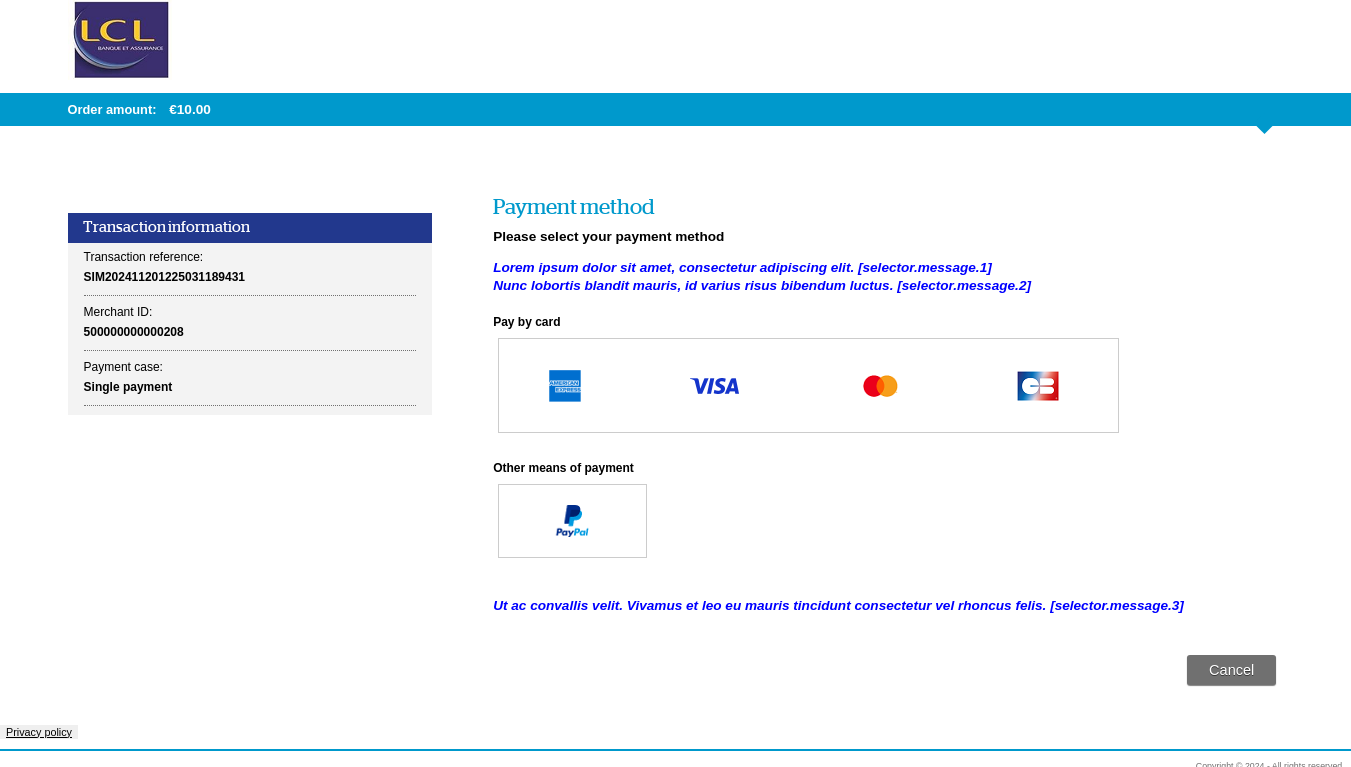
Summary:
| Key |
|---|
| selector.message.1 |
| selector.message.2 |
| selector.message.3 |
Card details entry page
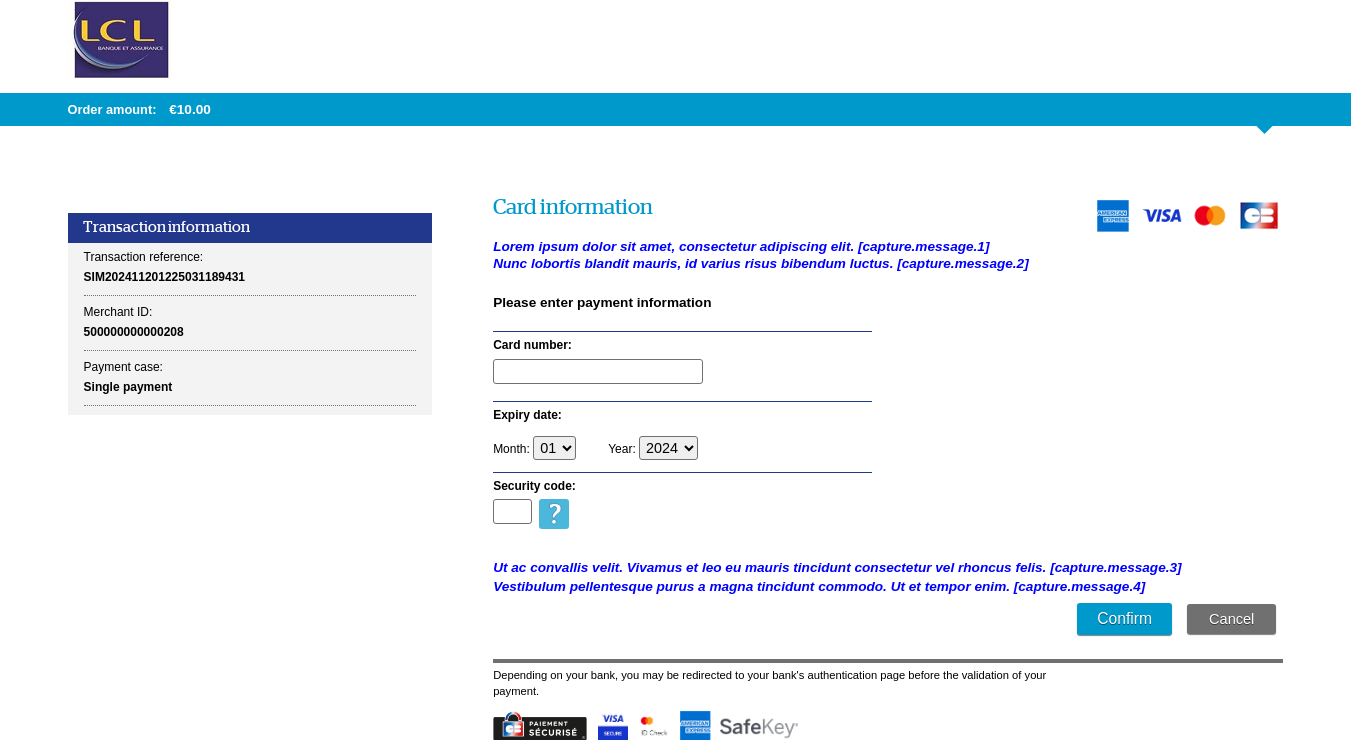
Summary:
| Key |
|---|
| capture.message.1 |
| capture.message.2 |
| capture.message.3 |
| capture.message.4 |
Security code help page
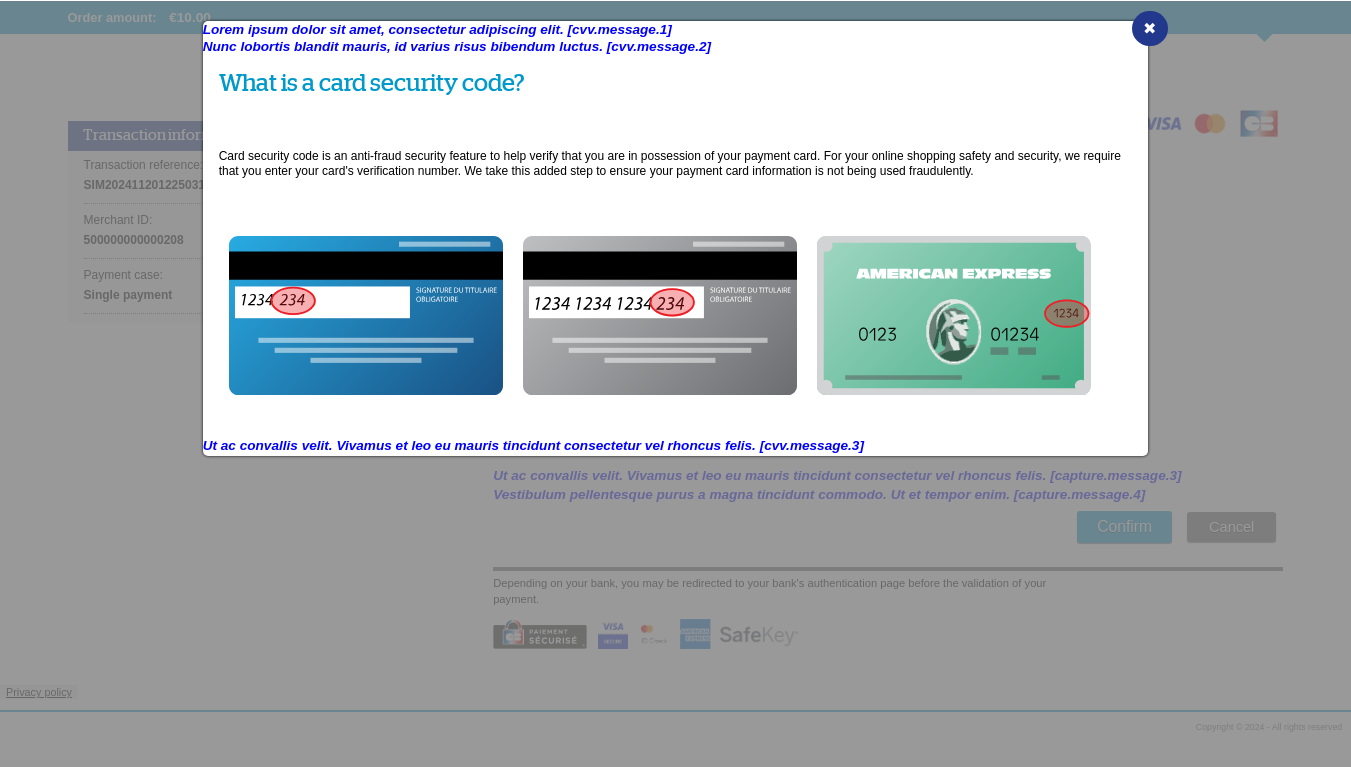
Summary:
| Key |
|---|
| cvv.message.1 |
| cvv.message.2 |
| cvv.message.3 |
Card details entry page with saving
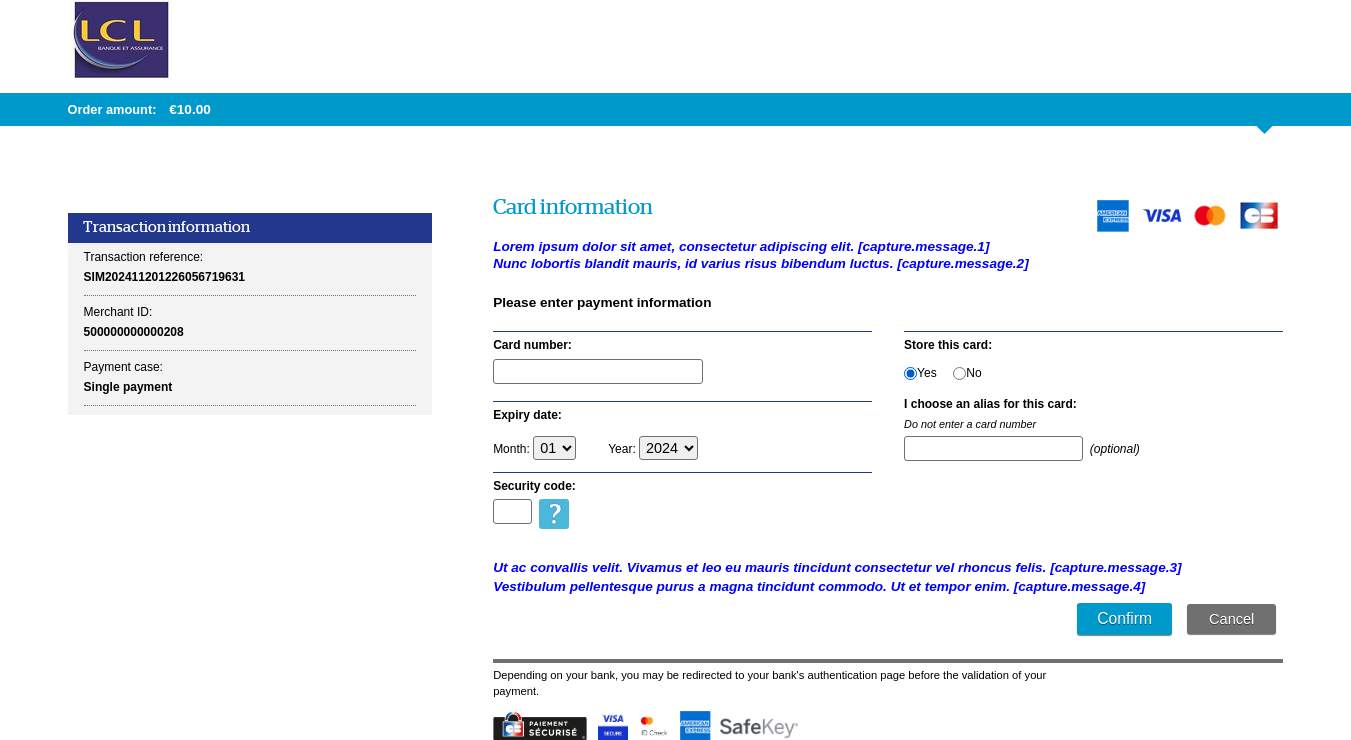
Summary:
| Key |
|---|
| capture.message.1 |
| capture.message.2 |
| capture.message.3 |
| capture.message.4 |
OneClick payment page
Summary:
| Key |
|---|
| capture.message.1 |
| capture.message.2 |
| capture.message.3 |
| capture.message.4 |
Payment confirmation page
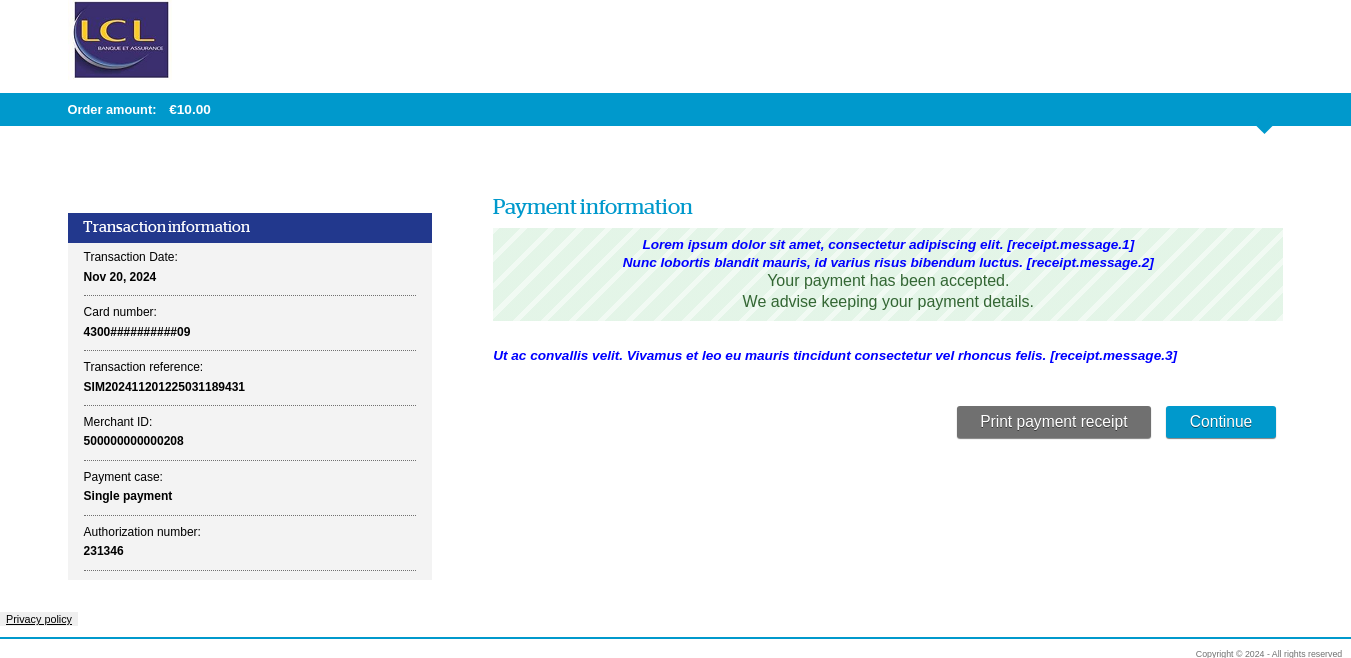
Summary:
| Key |
|---|
| receipt.message.1 |
| receipt.message.2 |
| receipt.message.3 |
Redirection page
No customisable message can be used in this page.
Language support
All the supported languages ares listed here:
| Code | Langue |
|---|---|
| cs | Czech |
| da | Danish |
| de | German |
| el | Greek |
| en | English |
| es | Spanish |
| et | Estonian |
| fi | Finnish |
| fr | French |
| hu | Hungarian |
| it | Italian |
| ja | Japanese |
| ko | Korean |
| lt | Lithuanian |
| lv | Latvian |
| nl | Dutsch |
| no | Norwegian |
| pl | Polish |
| pt | Portuguese |
| ro | Romanian |
| ru | Russian |
| sk | Slovakian |
| sl | Slovenian |
| sv | Swedish |
| tr | Turkish |
| uk | Ukrainian |
| zh | Chinese |
Frequently asked questions
Here are some frequently asked questions.
It's important to keep in mind that results may vary according to the offer customisation.
How to remove LCL logo on top left of the screen? Can we put our band logo instead of offer logo?
Yes, using the code below:
header[role="banner"] h1::before {
    content: url("../images/yourlogo.png");
}
Can we remove the merchant name?
Yes, and it can be done in 2 different ways:
- You can remove it through a "display: none" in CSS file.
div.main-data h3 { display: none; } - You can also ask to deactivate the “Display Merchant Name” option when you for your registration.
Can we remove the information table on the left?
If you offer the payment in instalments, the schedule will be displayed in this table and this is a mandatory regulatory information. If not, this information is not mandatory, you can remove it in the CSS file with this code:
aside.transaction-data h2 {
display: none;
}
dl.data-sheet {
display: none;
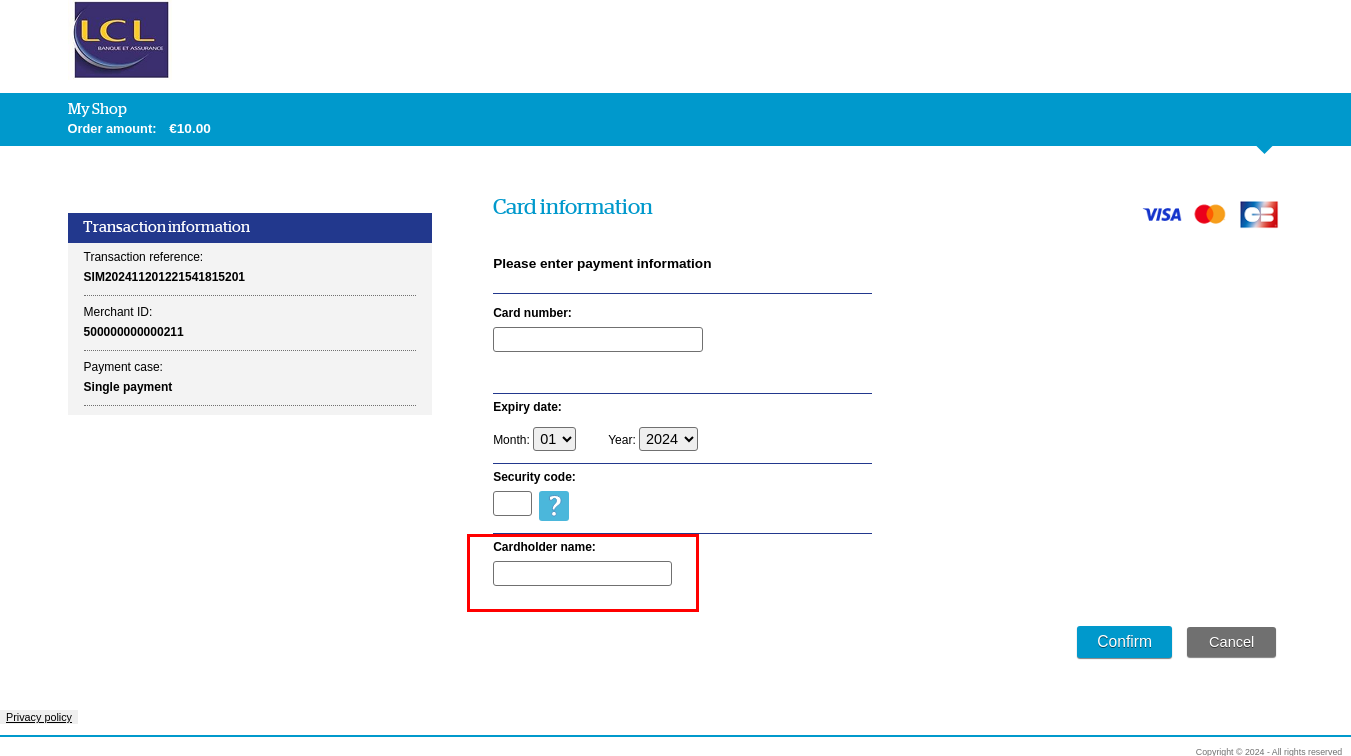
}Can we have cardholder name when we enter the card information?
Yes, you can ask for this merchant option, when you register your shop.
It will produce this display:
Can we only have 2 characters for the card's expiration year?
No, it's not possible.
Can we change the logo used for the Cancel/Submit buttons?
Yes, you can change the Submit button logo by using this code:
input[type="submit"]{
    background: transparent url("../images/your_button.png") no-repeat scroll 0 0;
    width: 142px;
    height: 34px;
    color: transparent;
    text-shadow: none;
    vertical-align: middle;
    box-shadow: none;
}
input[type="submit"]:hover, input[type="submit"]:focus, input[type="submit"]:active{
    color: transparent;
    background-color: transparent;
}
...and the logo used by Cancel button using this code:
a.bt-reset{
background: transparent url("../images/your_button.png") no-repeat scroll 0 0;
width: 132px;
padding: 0;
height: 34px;
color: transparent;
text-shadow: none;
vertical-align: middle;
box-shadow: none;
}
a.bt-reset:hover, a.bt-reset:focus, a.bt-reset:active {
color: transparent;
background-color: transparent;
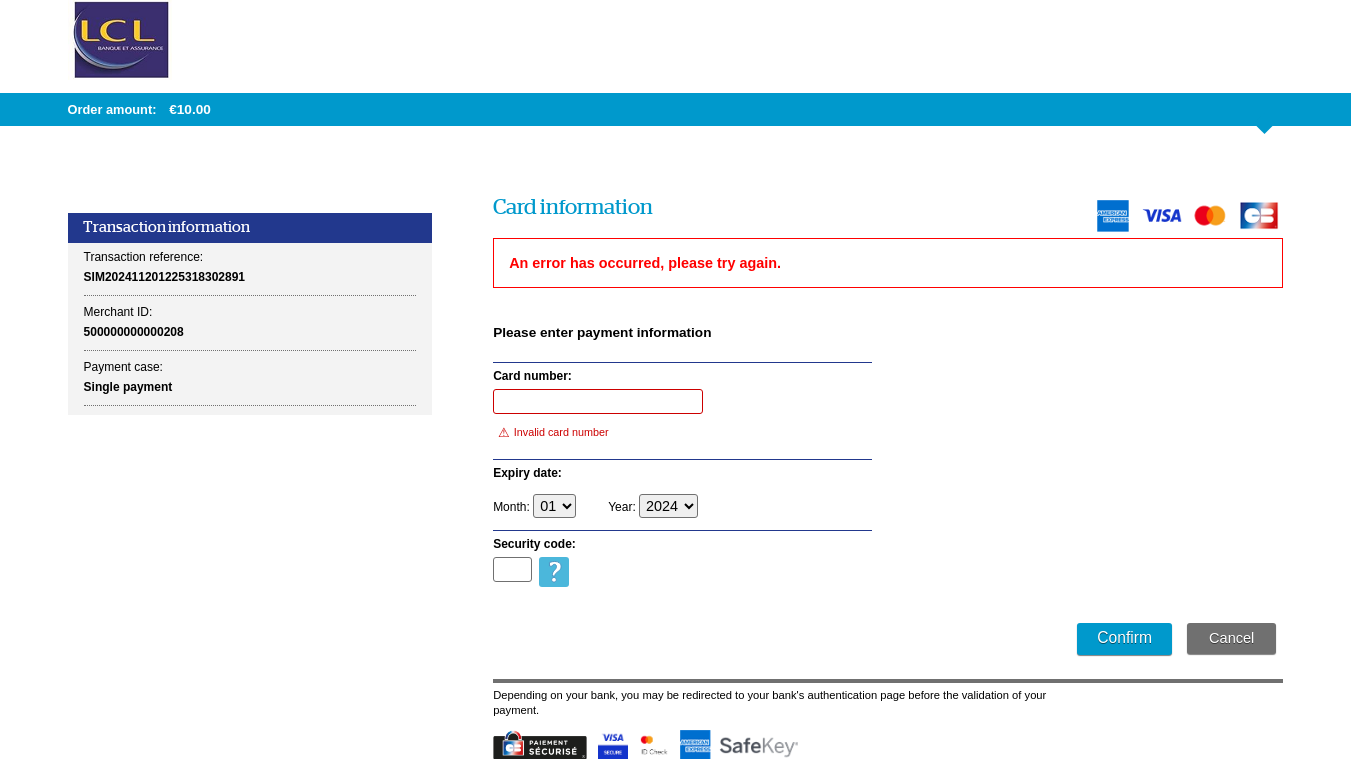
}Can we have a red border (instead of the red background) when an error occurs on this field?
Yes, use the following code:
    .has-error input, .has-error select {
        border-color: #C00;
        background-color: transparent;
        color: #000;
    }
This will produce this display:
Can we remove the ticket page with the payment information?
- Yes, you can ask for this option during your registration.
- You can also bypass this page on each request by passing “Y” value in the bypassReceiptPage field.